Wednesday, October 27, 2010

Pairing up Challenge Card #2

Hello All,

Vera and I are back with our second cards for the pair challenge.
This week we chose to make a "thinking of you" card.
My Card looks more like a thankyou card(for thanksgiving) I know, but I just got some new goodies I've been dying to try!
Card #2
For this Card I used lots of distress inks with a water brush;
The sky is watercolored with chipped saphire.  The grass with scattered straw  and pealed paint.
The pumpkin stem: antique linen, vintage photo, and pealed paint. The pumpkin; spiced marmalade, and dried marigold
the basket(cg199) colored with an e33 sand copic marker.  Pumpkin stamp(f5270) Sentiment (cl140) leaves are punched from 3 colors of cardstock.


See Vera's card here for the challenge

Thanks For Looking.  Hope to see you back next week for our final challenge.

Monday, October 25, 2010

I Won!!!!!!

I am so exited!!!! I have been taking the 8 week class over at 2peas called Holiday thinking inking with Jennifer Mcguire, which also has a challenge, doing the techniques you just learned, and I won!!! of course I wasn't the only Winner, My Fellow Hero Arts Fans Lin and Mary Dawn also were in the Winners Circle! and being a winner with 2 great Artists (even if it was random ; ) is just as satisfying. Here is the the link to the announcement
and this was my winning card!
Merry Christmas Owl

Wednesday, October 20, 2010

Pairing up Challenge Card 1

Vera and I will be pairing up every Wednesday for the next 3 weeks
And today the challenge is a Thank you card!

And with Jennifer’s holiday thinking inking classes on 2Peas, I’m learning many new techniques; one of which was making a paper rose and embossing it to give a shiny look. Very Fun!

                                                     Thank You Card
                                                            Materials listed below
Hero Arts old letter writing s4878, Hero Arts Thank you sayings cl341, Hero Arts Fanciful Filaments ll973 purple cardstock, cream cardstock, clear embossing powder, Close to my heart garden green ink, Versamagic chalk ink purple hydrangea, Tim Holtz Distress ink pumice stone.

Click Here to see Vera’s Thank You Card.


TFL!

Thursday, October 14, 2010

Thinking Inking Week 2, Technique: Block Stamping.

I have been taking an online 8 week class at 2 peas in a Bucket, learning techniques for stamping art. Each week there is a video and 3 new techniques, along with a challenge using what You've learned.
and this week, one if the projects are block stamping. "What is Block Stamping?" you say; That is where you ink up an acrylic block(used for acrylic peelable stamps and cling rubbers) instead of a stamp, and use it as a lovely background, instead of a layer of patterned or regular paper.
How do you do it? Watch Jennifer Mcguires video HERE

Card #1
Merry Christmas Deer

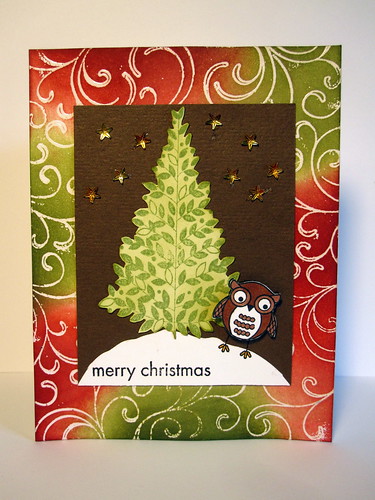
this is my first take on the class using block stamping.
1. I inked my Acrylic block with Peeled Paint distress ink, and pressed it on white cardstock,
2. I cut out the image created by the block and distressed the edge of my piece with walnut stain distress ink.
3. Then I inked the Hero Arts design block stencil(s5032) with Versa mark and pressed on top of my inked piece from step 1, giving it a subtle background. I stamped my saying (Hero Arts Holiday Sayings cl343)in black,
4. I took a piece of shimmery red cardstock and took a corner punch to one edge, and adhered all my pieces together, and added some red gems.
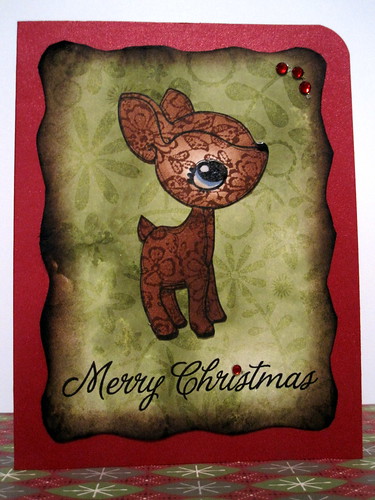
The deer was already done from the first class I took, but I'll go ahead and write how I did it.
The Deer was stamped in black dye ink onto a piece of white cardstock,
and distressed with vintaged photo distress ink, and stamped over with Hero Arts Lace Background again in Vintage photo, for his eye and nose I added glossy accents. I set it aside to dry and adhered it to my piece.

Card #2
Seasons Greetings

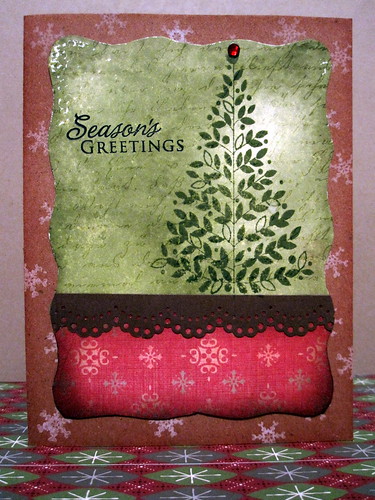
I followed step one and 2  from the first card. and instead of distressing the edges, I added a piece of patterned paper and cut it to fit the block design, distressing it's edges with walnut stain
2. I punched out a border with a Martha Stewart Punch and adhered and my patterned piece them the block image.
3. I stamped a tree (Hero Arts ar147) in the same pealed paint as I use for inking the block and inked the Hero Arts Old letter writing (s4878) also in versa mark,  and stamped over my tree, creating another subtle background. and stamped my sentiment in black (cl343)
4. I used a piece of kraft paper for my base, but it was the wrong color so I inked it with Tea Dye distress ink to make it a darker color. Then stamped snowflakes repeatedly in white around the base.
5 for the finishing touch I Ahered everything together and uploaded both cards 8~)

Monday, October 11, 2010

What? When? Where?... What Happened?

I really don't know! One day it was summer then all the sudden fall fell, (literally ;) and the year's more then half gone! So much has happened in so little time.   In between all this I managed to make about 50 cards just not the time to post them, Right now I am taking an 8 week card class at 2 peas, and trying to upload cards for Hero Arts October Challenge,  and filling out a couple card orders for some of my family. Even with all this, and though the time(and my age) is flying by, there is still plenty to enjoy and look forward to.
and  with all this I really hope to get back to blogging daily and maybe be able to  share my work more often.
Hannah